Tuesday, January 29, 2013

Braided Bead Bracelets

Hello! So it's been awhile since I posted any projects, but this is because I've mainly been working on crocheting a blanket and some scarves as presents. But when I came across this cute DIY tutorial on making braided bead bracelets, I just had to make some right away! All of the supplies she used can be purchased online, but I didn't feel like waiting and paying for shipping. Some readers commented that they found supplies at Hobby Lobby, but I don't have any of those stores near me. So I headed to my local Michael's and Jo-Ann to see what materials I could get by with...

...and now I can present to you the
"Alternative Braided Bead Bracelet Made With Easily-Accessible Materials"!
(great title, right?)

Here's what you'll need:
  • From Michael's: cording (I used bamboo cording, but it's a little soft) and 8-0 or 6-0 gold/bronze/silver beads
  • From Jo-Ann: gold buttons (about 0.5-inch diameter)
  • Other: Clear nail polish, scissors, ruler
Next, just follow the directions from this tutorial: http://honestlywtf.com/diy/diy-beaded-bracelet
**The one important step that I added was coating the ends of the cording in clear nail polish. Using nail polish is a neat little trick that allows you to use almost any cording you want, without worrying about the ends fraying. Using waxed cording makes this step unnecessary but that stuff is so hard to find in typical craft stores!


The finished product:


Wednesday, December 5, 2012

Bazaar Bizarre

This past weekend, my friends and I went to SF for Bazaar Bizarre, a holiday craft fair that was "not your granny's craft fair."

We took our time browsing the vendors - there were so many!

We saw lots of cute cards...

beautiful displays...

and even got some hands-on crafting at free DIY stations!


 We also got to take free photos in the Magnolia Photo Booth :)


The Renegrade Craft Fair holiday market is also coming up soon, Dec 15+16!

Monday, November 12, 2012

"scarfing"

My word of the month: scarfing! I'm pretty sure I made this word up. Because while I do enjoy eating copious amounts of food, I'm actually referring to the process of making scarves. Two years ago, my friend crocheted a beautiful scarf and gave me a link to the pattern she used. At the time, I lacked the skill and patience to make it. Two weeks ago, I decided to tackle this scarf once more. After one day of confusion, I figured things out and it ended up being such a fun project!

I made this Chunky Circle Scarf following this pattern.
I learned how to crochet the pattern of little circles from watching this video.


I loved the results so much that I'm currently working on a second one! 


After this I am excited to try some new patterns and maybe even design my own. Looks like I'll be scarfing all winter long :)

Monday, September 17, 2012

measure twice, cut once: lessons from a sewing fail

"measure twice, cut once."

I think this phrase originated from woodworking - once you cut a piece of wood, you can't grow it back. The same goes for fabric. You can't really fix a piece of fabric that you've cut too small. But in my most recent crafting failure, I should have followed this advice figuratively - (from wikitionary:) "plan and prepare in a careful, thorough manner before taken action."

You see, it wasn't my imprecise measurements that led me astray. Instead, it was my impatient eagerness to begin a new project. I had just gotten my new Nexus tablet, and found a really lovely pattern online for making a padded sleeve. I was so excited that the author had already determined the appropriate measurements that even when my instinct hinted that there was something odd about them, I ignored these thoughts. I put my trust in the author - "there's no way she could be wrong," I thought.

4 hours later, I stared at my project in disbelief after realizing it was just 0.5 inches too small. Just a half inch bigger and my tablet would have fit. My frustration was compounded by the fact that linen I used was terribly difficult to work with, otherwise I would have finished in half the time. I was so frustrated that I threw my project on the ground and called it a night. I wanted to blame the author, but I knew it was really my fault. Had I taken an extra 10 minutes to double check how the measurements would match up to the end result, I would not have wasted 4 hours. I should have trusted my instincts telling me that the measurements didn't make sense.

The next day, I started over, this time using my own measurements. Success!
(failure on right, success on left)

Turns out those 4 hours were not a waste of time, but yet another valuable lesson learned from crafting.

Friday, September 14, 2012

apartment crafting night

I am happy to announce that my third roommate, Annie, has fallen in love with card-making! This is a big deal because while Rachel and I have always obsessed over crafting, Annie would usually admit she had little interest. But one weekend she mysteriously returned from home with a newfound passion for making cards! Welcome to the crafting world, Annie!

Since, then we've had a couple of apartment crafting nights (yes, I know we are like grandmas).

Here are a couple of Annie's awesome cards:


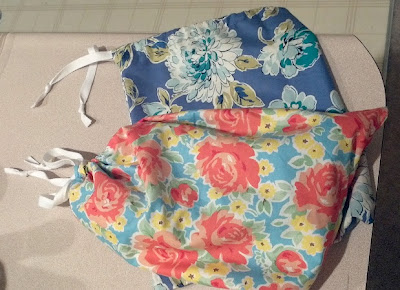
Last weekend, our friend Rosanna visited and joined us for a crafting night. I gave her a mini sewing lesson and we made matching shoe bags, since we both have med school interviews coming up.


Pretty AND practical! perfect for keeping our heels from getting stuff dirty. It was also a perfect beginner's project because it is very straight-forward. If you need a tutorial, this one is great: http://blog.betzwhite.com/2009/02/shoe-bag-tutorial.html.


Friday, August 17, 2012

california academy of sciences - CRAFT NIGHT!

Tonight my roommate and I went to NightLife at California Academy of Sciences in SF. For those who don't know, NightLife is the Academy's 21+ event every Thursday night. I was super excited to go to this one because it was craft themed!!

Besides checking out the usual exhibits and displays, we visited a mini craft market with a bunch of arts and craft vendors. The coolest part was "African Hall," a hall filled with African wildlife dioramas, being transformed into a DIY paradise. Crafting among zebras and cheetahs was such a unique experience!


Crafting among African wildlife!


Craft station #1: Sewing with conductive thread
It's this hip new thing (well, new-ish) called soft circuits, basically involving sewing electronics into fabrics. To make a complete circuit between a battery and LED, we used conductive thread and metal snap buttons. See more soft circuit projects here: http://makeprojects.com/c/Soft_Circuits

Once we snapped these "bracelets" around our wrist, the circuits were completed and LEDs lit up! We will probably never ever wear these.


Craft station #2: metal stamping. I've been wanting to try metal stamping for awhile, but didn't want to invest in a stamp set. 
After I got home, I added some contrast by filling in the indentations with Sharpie, and then using an alcohol wipe to wipe away the excess Sharpie.

Finally, the highlight of my evening - baby ostriches! 51 days old!

Monday, August 13, 2012

RCW (Random Creations of the Week)

2 random things I made this week. I think my taste is becoming more and more minimalistic...can't decide if this is good or bad.

1. heart garland made with my roommate's new heart punch + free paint chips!

2. more embroidery art! this one is titled "rocky relationship"