Wednesday, December 5, 2012

Bazaar Bizarre

This past weekend, my friends and I went to SF for Bazaar Bizarre, a holiday craft fair that was "not your granny's craft fair."

We took our time browsing the vendors - there were so many!

We saw lots of cute cards...

beautiful displays...

and even got some hands-on crafting at free DIY stations!


 We also got to take free photos in the Magnolia Photo Booth :)


The Renegrade Craft Fair holiday market is also coming up soon, Dec 15+16!

Monday, November 12, 2012

"scarfing"

My word of the month: scarfing! I'm pretty sure I made this word up. Because while I do enjoy eating copious amounts of food, I'm actually referring to the process of making scarves. Two years ago, my friend crocheted a beautiful scarf and gave me a link to the pattern she used. At the time, I lacked the skill and patience to make it. Two weeks ago, I decided to tackle this scarf once more. After one day of confusion, I figured things out and it ended up being such a fun project!

I made this Chunky Circle Scarf following this pattern.
I learned how to crochet the pattern of little circles from watching this video.


I loved the results so much that I'm currently working on a second one! 


After this I am excited to try some new patterns and maybe even design my own. Looks like I'll be scarfing all winter long :)

Monday, September 17, 2012

measure twice, cut once: lessons from a sewing fail

"measure twice, cut once."

I think this phrase originated from woodworking - once you cut a piece of wood, you can't grow it back. The same goes for fabric. You can't really fix a piece of fabric that you've cut too small. But in my most recent crafting failure, I should have followed this advice figuratively - (from wikitionary:) "plan and prepare in a careful, thorough manner before taken action."

You see, it wasn't my imprecise measurements that led me astray. Instead, it was my impatient eagerness to begin a new project. I had just gotten my new Nexus tablet, and found a really lovely pattern online for making a padded sleeve. I was so excited that the author had already determined the appropriate measurements that even when my instinct hinted that there was something odd about them, I ignored these thoughts. I put my trust in the author - "there's no way she could be wrong," I thought.

4 hours later, I stared at my project in disbelief after realizing it was just 0.5 inches too small. Just a half inch bigger and my tablet would have fit. My frustration was compounded by the fact that linen I used was terribly difficult to work with, otherwise I would have finished in half the time. I was so frustrated that I threw my project on the ground and called it a night. I wanted to blame the author, but I knew it was really my fault. Had I taken an extra 10 minutes to double check how the measurements would match up to the end result, I would not have wasted 4 hours. I should have trusted my instincts telling me that the measurements didn't make sense.

The next day, I started over, this time using my own measurements. Success!
(failure on right, success on left)

Turns out those 4 hours were not a waste of time, but yet another valuable lesson learned from crafting.

Friday, September 14, 2012

apartment crafting night

I am happy to announce that my third roommate, Annie, has fallen in love with card-making! This is a big deal because while Rachel and I have always obsessed over crafting, Annie would usually admit she had little interest. But one weekend she mysteriously returned from home with a newfound passion for making cards! Welcome to the crafting world, Annie!

Since, then we've had a couple of apartment crafting nights (yes, I know we are like grandmas).

Here are a couple of Annie's awesome cards:


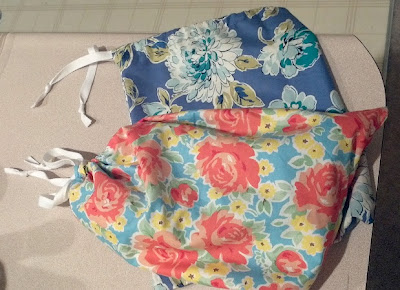
Last weekend, our friend Rosanna visited and joined us for a crafting night. I gave her a mini sewing lesson and we made matching shoe bags, since we both have med school interviews coming up.


Pretty AND practical! perfect for keeping our heels from getting stuff dirty. It was also a perfect beginner's project because it is very straight-forward. If you need a tutorial, this one is great: http://blog.betzwhite.com/2009/02/shoe-bag-tutorial.html.


Friday, August 17, 2012

california academy of sciences - CRAFT NIGHT!

Tonight my roommate and I went to NightLife at California Academy of Sciences in SF. For those who don't know, NightLife is the Academy's 21+ event every Thursday night. I was super excited to go to this one because it was craft themed!!

Besides checking out the usual exhibits and displays, we visited a mini craft market with a bunch of arts and craft vendors. The coolest part was "African Hall," a hall filled with African wildlife dioramas, being transformed into a DIY paradise. Crafting among zebras and cheetahs was such a unique experience!


Crafting among African wildlife!


Craft station #1: Sewing with conductive thread
It's this hip new thing (well, new-ish) called soft circuits, basically involving sewing electronics into fabrics. To make a complete circuit between a battery and LED, we used conductive thread and metal snap buttons. See more soft circuit projects here: http://makeprojects.com/c/Soft_Circuits

Once we snapped these "bracelets" around our wrist, the circuits were completed and LEDs lit up! We will probably never ever wear these.


Craft station #2: metal stamping. I've been wanting to try metal stamping for awhile, but didn't want to invest in a stamp set. 
After I got home, I added some contrast by filling in the indentations with Sharpie, and then using an alcohol wipe to wipe away the excess Sharpie.

Finally, the highlight of my evening - baby ostriches! 51 days old!

Monday, August 13, 2012

RCW (Random Creations of the Week)

2 random things I made this week. I think my taste is becoming more and more minimalistic...can't decide if this is good or bad.

1. heart garland made with my roommate's new heart punch + free paint chips!

2. more embroidery art! this one is titled "rocky relationship"

Tuesday, July 31, 2012

ingenious spray bottle

Every so often I come across an idea so simple yet so genius that I think "Wow, I wish I had thought of that!" Especially as an engineer, I find this spray bottle from Make Projects absolutely brilliant!


I actually can't think of a situation where I've had to turn my spray bottle completely upside down, but I have had to use it sideways, so this would be very helpful. Can't wait to try it!

Friday, July 27, 2012

Tutorial: personalized embroidery art


An EASY PEASY gift that can be made in less than 30 minutes!! I've been seeing a lot of cute bunting in crafts these days, and was excited about trying out something with bunting myself. I especially wanted to make something that would be a cute, simple, and quick last-minute gift.

Step 1. Cut out a square of fabric and place in mini embroidery hoop. I used a very small 4-inch hoop. With a disappearing ink pen, mark the fabric where you want your bunting to go. I just made 2 tiny marks on either end of where I imagined the bunting would go.


Step 2. Cut some tiny triangles of whatever scrap fabric you have around.


Step 3. Cut a strip of double-stick fusible webbing. Peel off one side to reveal stickiness. Place all of the triangles on the sticky side, then trim away the excess fusible webbing. You should be left with fabric triangles with sticky stuff on the back. 


Step 4. Arrange the triangles on your fabric (without the embroidery hoop), and iron into place. (You can see that my college budget version of an ironing board is a towel on a table.)


Step 5. Place back in embroidery hoop. Use any color embroidery floss to make a "line" that connects all the triangles. Also add the recipient's name!
If you've never embroidered before, there are some really great tutorials on the web. (Like here: http://blog.craftzine.com/archive/2012/06/new_how-to_embroidery_videos_f.html) Learning how to embroider a simple line is a great starting point! Since a name might be a tad more difficult, you could just use a Sharpie for that part. 


Step 6. Trim away the excess fabric around the hoop. Tuck in and glue into place with a hot glue gun.


FIN. And ready to be gifted!

Friday, July 20, 2012

Tutorial: "Clothesline" Wall Display


Got a blank wall and no fancy art to fill it with? I did! Until I came across some mini clothespins at my local Jo-ann store and decided to try out this wall display. It's super easy and makes you look instantly artsy :)

You only need 3 things:

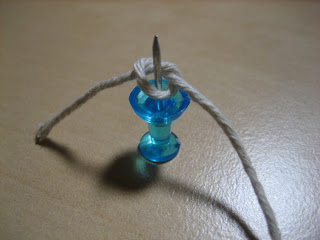
Step 1: Start your first push pin by tying a knot with your string, around the pin. Pin this into the wall. This will be the uppermost left or right point of your display, depending on which direction you go with the next pin. 

Step 2: Insert your second push pin into the wall (see the title photo for reference). Wrap the string one complete time around the pin, leaving a little slack in the string. 

Step 3: Start hanging photos on the first segment. I like to do this before adding more push pins because  you can't really anticipate how the weight of the photos/cards will affect the look of your string until you actually try it. I learned this the hard way! 

Step 4: Repeat Steps 2 and 3 with more push pins and more photos! 

Step 5: When you get to the last push pin, tie the string just like the first one. 

Some notes:
* My display is kind of short width-wise, but only because my wall space was limited by my bookcase. 
* You'll probably have to play around with the weight distribution of your photos to make it look pretty.

My finished product! (with some room to spare)

Wednesday, June 27, 2012

hunger games shirts

My roommate and I were inspired to make Hunger Games shirts after seeing a tutorial by Sweet Verbena.

We printed out her pattern and cut out a stencil,

positioned the stencil in the most desirable position,

used tiny stickers to remember how to position the stencil,

covered the area and spray painted with gold paint,

let our shirts dry, and finally tried them on!


Tuesday, June 26, 2012

Tutorial: Patching a couch

My apartment has a lovely couch that is quite comfy but has some large gaping holes where the white stuffing is exposed. My crafty roommate and I spent some time discussing ways of making covers for the two seat cushions, until we both got pretty busy with work and med/dental school applications. Meanwhile, as our couch kept being sat on, one of the small rips grew larger and larger until I decided I had to do something about it. Instead of making a whole new cover, I wanted a solution that would:

  • be quick and easy
  • stop the rip from growing
  • feel smooth on the couch (so it wouldn't bother us when we sat on it)
I settled on this quick and dirty method of patching up a fabric-covered couch:

Materials:
- Embroidery thread 
- Embroidery needle (a curved one will be easier to use)
- Double-stick fusible web (I used Steam-a-seam Lite)
- Simple fabric

1. Close the gap with a basic overhand stitch. This is to stop the rip from growing. Make sure to go over your stitches several times at the beginning and end, since this is where the rip could grow from. 


2. Cut out matching pieces of fabric and fusible web, just big enough to cover your entire seam. For the best results, they should be the exact same size. To achieve this, cut out rough shapes at first, then peel off one side of the backing to reveal the sticky fusible web. Place the fabric on this side, then trim them both together to get your final shape. 


3. Iron on the fabric "patch." Peel off the other side of backing and stick the fusible web/fabric combo onto the couch, and iron according to the instructions of the fusible web packaging. 

ta-da! no more giant, gaping hole!


Wednesday, June 20, 2012

Tutorial: men's shirt to tie front shirt


My first men's shirt refashion! 1 down, 3 to go! It took me a whole afternoon to decide what I wanted to do with this shirt. And I finally decided on...a shirt! But sleeveless and smaller. And I thought the bottom would look awkward with just a regular hem so I made it a tie front. 


Here's how you can do it:


1. Cut off the sleeves. I initially just cut along the seam, then cut more later after I decided how narrow I wanted the shoulders to be.

2. Take in the sides. Turn the shirt inside out and sew along the sides so that the shirt will be more fitted to your body. If you have a shirt that fits you well, you can use it as a template. Or just try the shirt on and estimate how much you want to take it in. Except when I did this I made it too tight and had to use my trust seam ripper and start over. Therefore it's a good idea to use a basting stitch first. After the basting stitch, I went back over the seam with a zig-zag stitch since I don't have a serger. I also cut the excess fabric off with pinking shears as an additional measure to minimize fraying.


3. Cut and hem the bottom. For the front, leave two "tails" to be tied together when wearing the shirt. I outlined mine below because it was hard to see them in the photo. For the back, you can just cut straight across, or leave a rounded bottom. Again, you could use an existing shirt as a template but I just felt like freehanding it. 

To hem, make sure the shirt is inside out. Along all of the bottom, fold in 1/4", then another 1/4' to hide the raw edge. Sew with a straight stitch. Because of the curves, you'll probably have to do this a few inches at a time. This was the hardest part for me because I have yet to master pretty hems. 

4. Hem the armholes, just as you hemmed the bottom. Like I mentioned earlier, I ending up cutting more off after trying the shirt on and deciding on what looked best. My roommate Rachel advised me that the narrower the shoulder, the more flattering it will be for your arms. I never really noticed this, but I took her advice!

....ALL DONE!